how to clear space on hard drive windows 10
 Source: Windows Central
Along Windows 10, you have several options to free up space on your computer. Although nowadays, laptops and desktops come with drives featuring multiple terabytes of storage, we always find a way to fill them up with documents, pictures, videos, apps, and games, causing the system to work slower, problems saving files, and many other issues.
If your twist is running humiliated on space, Windows 10 comes with tools care Storage Gumption, OneDrive Files On-Demand, Clayey OS, NTFS concretion, and others to erase unnecessary files, apps, and games, which can help to reclaim space, improve performance, and resolve problems during updates.
In this Windows 10 guide, we will walk you through the best slipway to free up reposition space on your computer to depot more files and install lineament updates without issues.
- Free dormie space clearing Reprocess Bin on Windows 10
- Free up space removing detritus files with Storage Horse sense on Windows 10
- Free up distance deleting temporary files using Disk Cleansing on Windows 10
- Free up distance using OneDrive files on-demand on Windows 10
- Free up space removing not-essential apps and games on Windows 10
- Free up distance trasnfering files to external crusade
- Free up blank using NTFS compression
- Gratuitous up space disabling Hibernation on Windows 10
- Free upbound space compressing installation footprint of Windows 10
- Free up space rebuilding look for indexer connected Windows 10
- Disembarrass up distance deleting users no longer sharing device on Windows 10
- Free upwardly distance disabling Reserved Storage along Windows 10
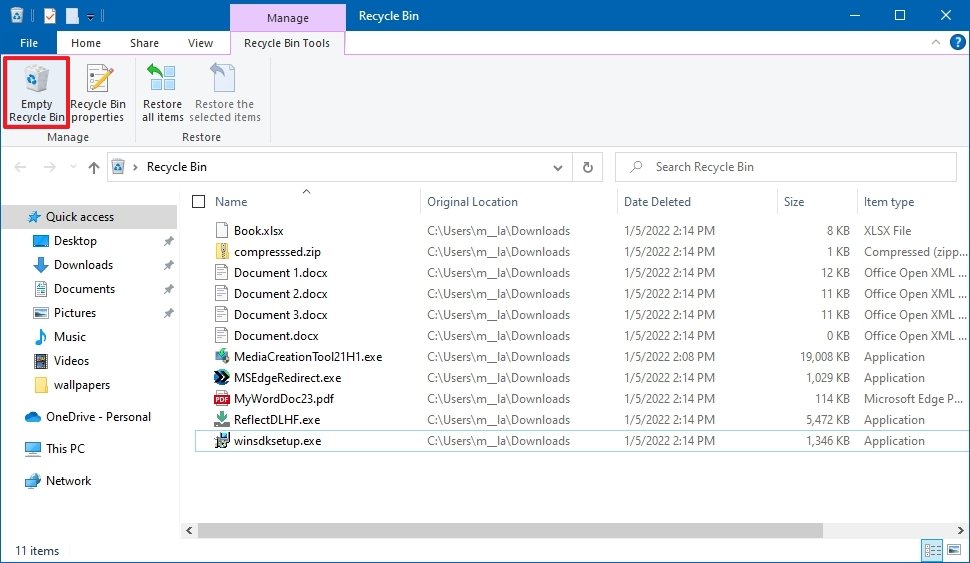
1. Unbound up space clearing Recycle Bin connected Windows 10
Windows 10 doesn't erase the files from the hard drive when you delete them. Instead, they are relocated to the Recycle Bin and noticeable for deletion to give you the luck to recover the files if you involve them back. Withal, since the Recycle Bin can grow large over time, emptying its contents is the first thing you can do to free up place.
Connected Windows 10, when deleting files, the system does not erase them from the hard drive. Instead, they are placed inside the Recycle Bin if you need them back. However, depending on how the feature is configured, over time, the Recycle Bin can take up a lot of distance, which means that emptying the bin is unrivalled of the low gear actions you should take to regain blue-chip storage space.
To empty the Recycle Bin to regain storage infinite on Windows 10, use these steps:
- Open Start.
-
Search for Recycle Bin and click the tip result to open the app.
Speedy tip: If the app does not appear in the result, you can capable File Explorer (Windows winder + E) and then type Recycle Bin and press Enter in the address relegate.
- Mouse click the Recycle BIN Tools tab.
-
Click the Empty Recycle Bin button.
 Source: Windows Central
 - Click the Yes release.

At one time you complete the steps, the arrangement will unoccupied rising just about 10 percent of the drive electrical capacity (assuming the Recycle Bin is full).
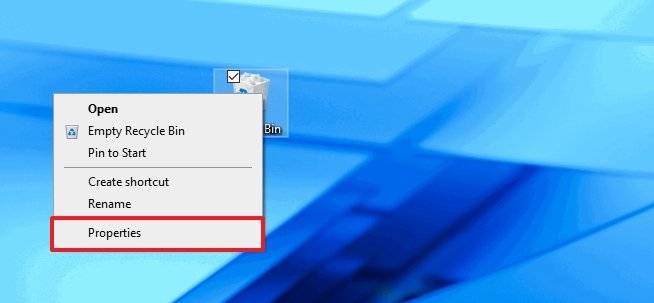
Change Reprocess Bin settings
Windows 10 reserves 10 per centum of the free space for deleted files. Once the doorway is reached, the system testament automatically cancel files from the oldest to the newest. If you deprivation, it's achievable to adjust how much space the system should use for the Reprocess Bin.
To slim the space utilization for the Recycle Bin, use these steps:
- Use the Windows + D keyboard shortcut to view the screen background.
-
Right-click the Recycle Bin icon and select the Properties option.
 Source: Windows Central
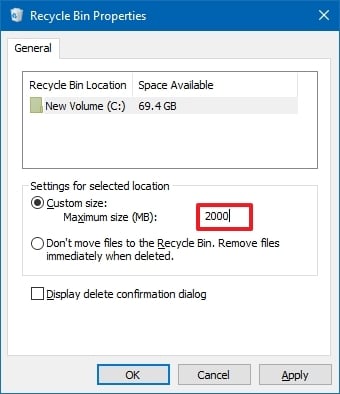
 - If you have multiple partitions, select the Reprocess Bin location you deficiency to configure. For example, Local Disk (C:) is the motor where Windows 10 is installed.
- Under the "Settings for selected location" section, pick out the Custom size pick.
-
In the "Level bes sized (MB)" field, define the maximum disk drive space in megabytes that Recycle Bin can use on the particular partition.
 Source: Windows Central
 - (Facultative) Check the Don't move files to the Reuse BIN. Remove files in real time when deleted option if you want to delete the files from the drive skipping the Reprocess Bin to minimize storage usage.
- Chink the Apply button.
- Click the OK Push button.


After you complete the steps, the Recycle Bin will be able to continue Sir Thomas More or few files from a picky location, depending on your configuration.
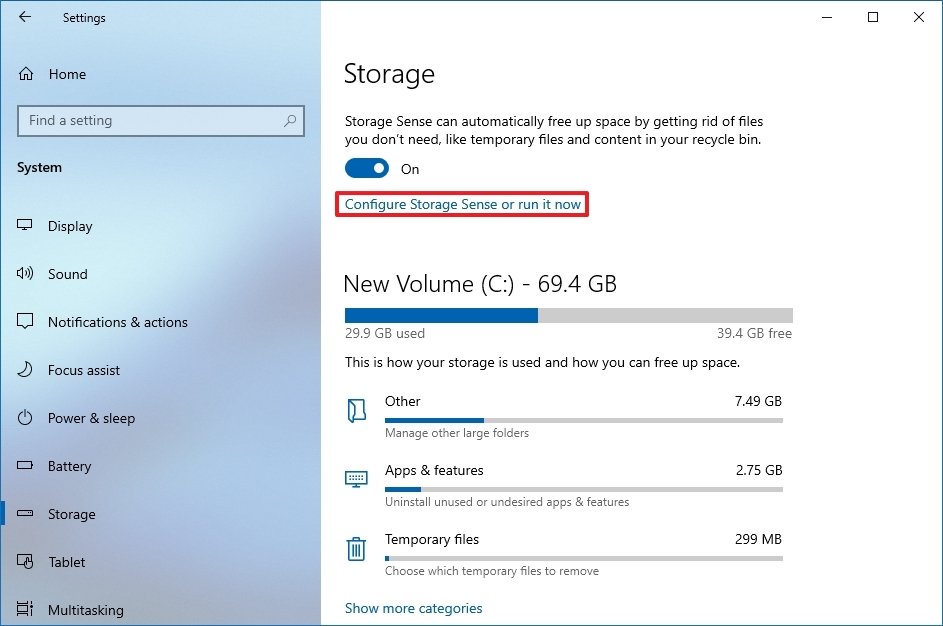
2. Resign up space removing junk files with Storage Sense on Windows 10
Storage Sense is a feature that allows you to delete different types of junk files (including previous installment files after an upgrade and temporary files) to free up quad on the primary and secondary drives to make room to store else files and improve drive away efficiency.
Enable Memory Sense
Although you can practice Storage Sense manually, it's assertable to enable the feature to run maintenance automatically to help avoid running out of space quickly.
To enable Storage Sense on Windows 10, use these steps:
- Open Settings.
- Click on System.
- Click on Storage.
-
Under the "Storage" section, click the Configure Storage Sense or run it at once option.
 Source: Windows Central
 - Turn on the Storage Gumption toggle switch tack.
-
Consumption the "Track down Storage Sense" drop-down carte and blue-ribbon the best option for your situation:
- Every day.
- Every workweek.
- Every month.
- During low free disk space (suggested).
 Source: Windows Central


Erstwhile you complete the steps, Storage Sense will run automatically at the schedule you specified to unfixed up space and improve storage performance.
The option to enable the feature is also available from the "Store" page. However, using this option only activates the default settings. Utilizing the Storage Sense settings Page lets you configure how the feature should remove unnecessary content.
Edit superfluous files with Storage Sense
To free up space using Storage Sense, use these stairs:
- Open Settings.
- Click on System.
- Click on Storage.
-
Under the "Storage" section, click the Configure Storage Sense or run it now selection.
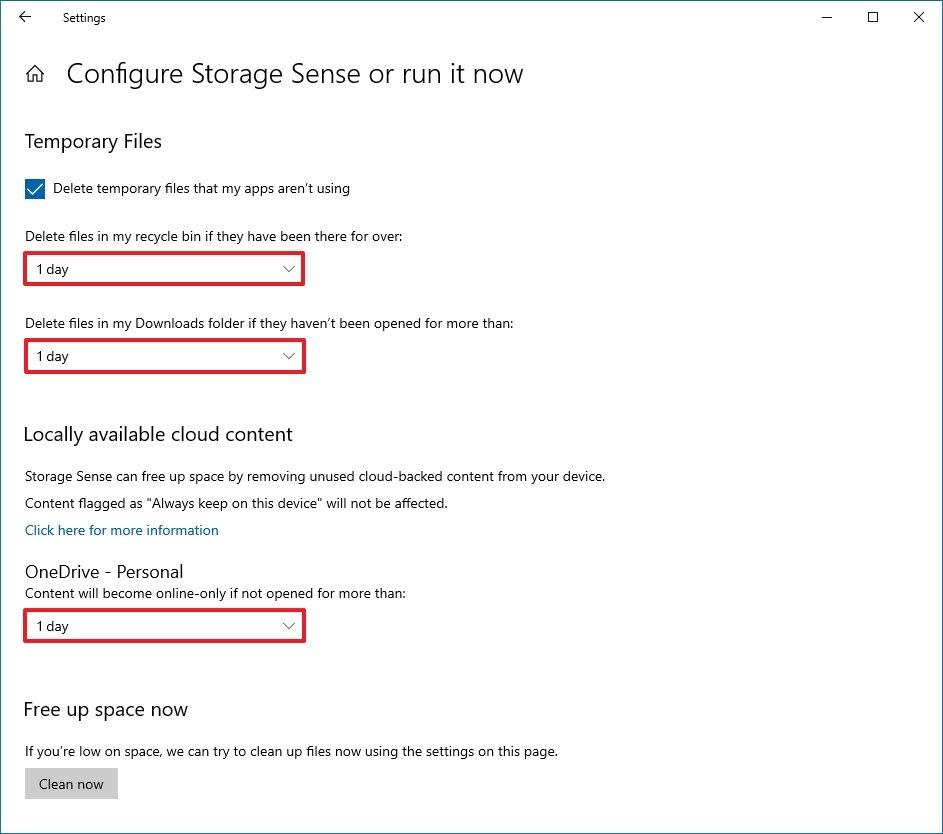
Origin: Windows Central - Under the "Temporary Files" section, check the Delete temporary files that my apps aren't using alternative.
- Utilise the Recycle Bin knock off-down menu to specify how to clear already deleted files you do not involve.
-
Use the Downloads drop-down menu to specify how to clean up downloaded files.
Quick tip: If you need to delete the most files, apply the 1 day alternative. The Downloads folder may contain valuable files you may have downloaded from the internet, which substance that it is advisable to backup those files manually before running the lineament.
-
Nether the "Locally forthcoming cloud content" section, employ the drop cloth-land carte du jour to specify how long-wool OneDrive content synced to the device becomes online-only.
 Source: Windows Central
 Quick note: This option is separate of OneDrive Files On-Demand that allows you to accession your documents, pictures, videos, and other files exploitation File Explorer without needing to sync them to reduce the space exercis. When the device is running low on space, you rear end use it to make files only available in the cloud. You volition still see your files, but their content testament solitary download when you need them.
-
Nether the "Discharged up space now" section, check the Delete previous versions of Windows option (if applicable).
Quick note: This alternative can free up or so 20GB of space, but the storage will vary from system to arrangement.
- Clack the Clean now button.

Storage Sense will run and delete unnecessary files from the computer to reclaim more space after complemental the stairs.
Edit temporary files with Warehousing Sense
Reposition Sense likewise deletes temporary system and apps files that can help to regenerate some gigabytes of blank happening your Windows 10 twist.
To cancel part-time files from the device, use these steps:
- Hospitable Settings.
- Click on System.
- Click on Storage.
-
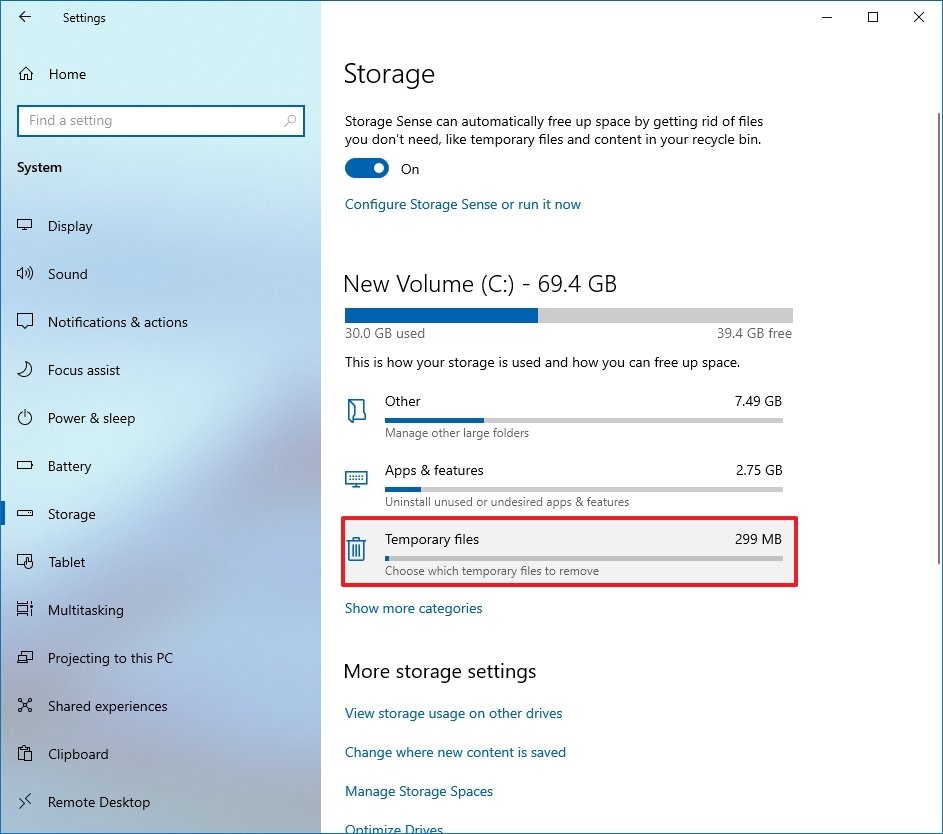
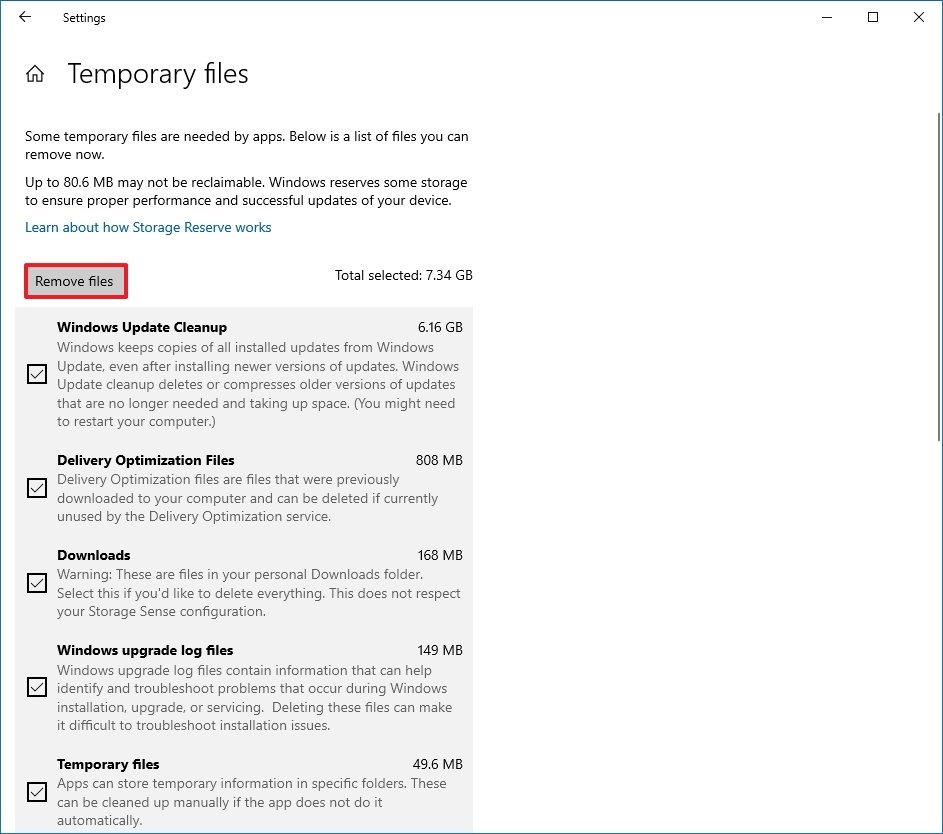
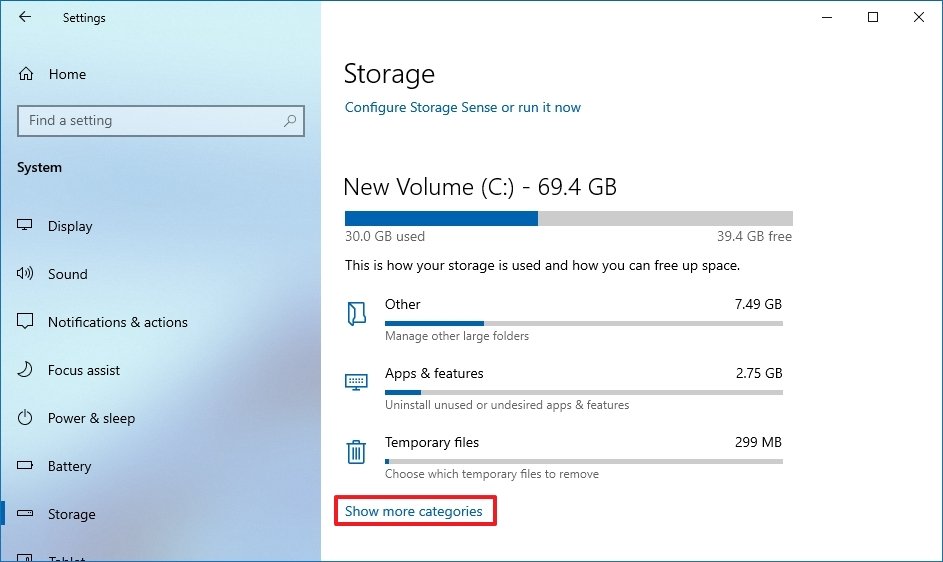
Under the "Topical anesthetic Disk (C:)" section, click the Acting files item. (If the item is not available, tick the Show more categories option.)
 Source: Windows Halfway
 -
Check all the items you wishing to remove to optimize the space. For example:
- Downloads.
- Windows Update Cleanup.
- Recycle BIN.
- Delivery Optimization Files.
- Thumbnails.
- Microsoft Defender Antivirus.
- Temporary Internet Files.
- Temporary files.
- Windows fault reports and feedback diagnostics.
- DirectX Shader Cache.
- Preceding Windows installation(s).
- Temporary Windows induction files.
Fast slant: The available items Crataegus laevigata differ on your installation. If you want to choice the Downloads item, before clearing these files, make a point to understand that this choice will erase everything therein folder.
-
Mouse click the Remove files button.
 Source: Windows Central


Afterwards you complete the steps, the selected files volition be deleted permanently, freeing up space for more important files.
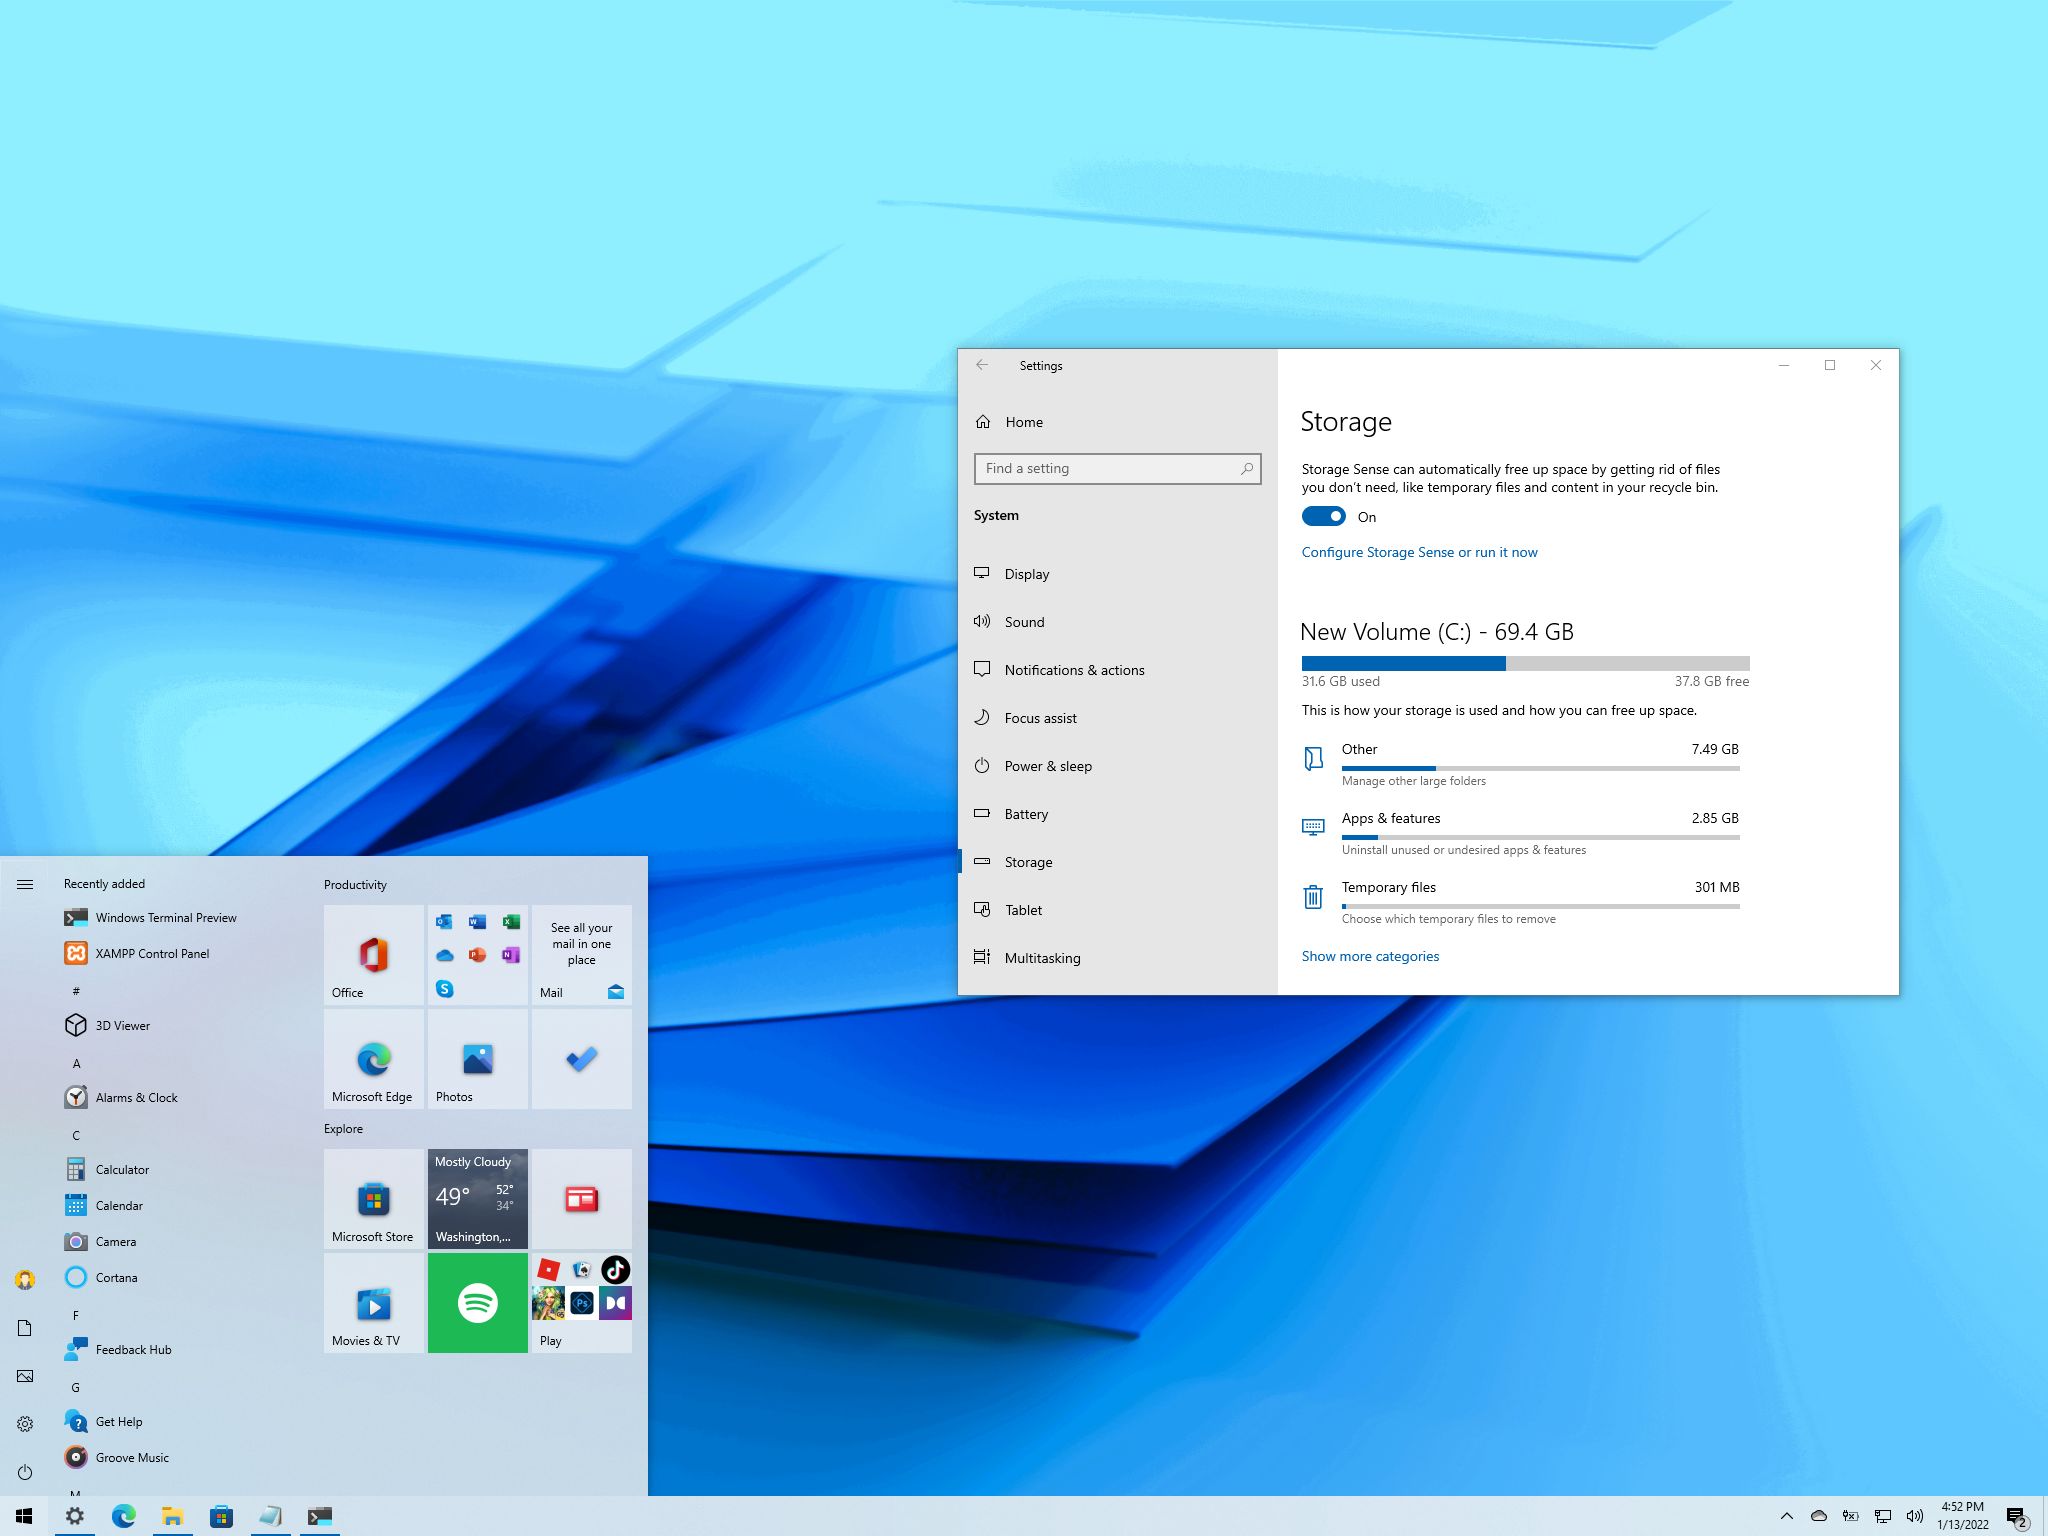
Sight storage usage on Windows 10
On Windows 11, Storage Sense is as wel a great tool to help you understand which files use the most place to determine the files you can straighten out.
To view the storage usage along Windows 10, use these steps:
- Open Settings.
- Click on System.
- Chatter on Reposition.
-
Nether the "Local Disk C:" segment, get across the Show Sir Thomas More categories option.
 Source: Windows Halfway
 -
See how the storage is beingness utilized.
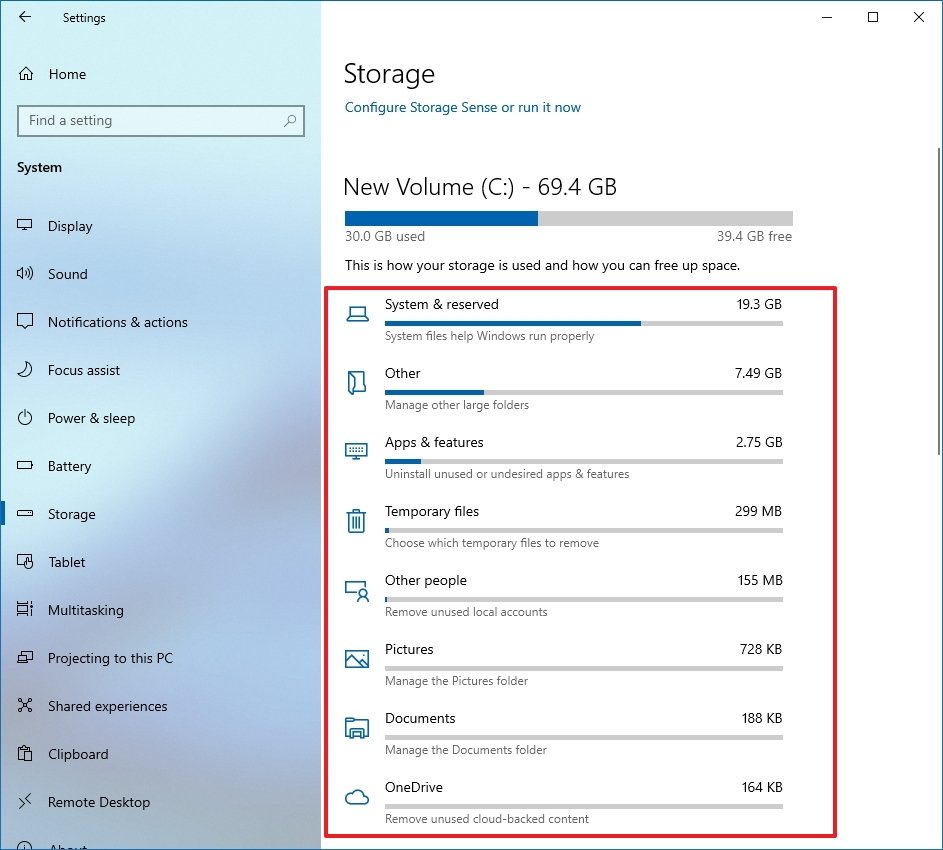 Generator: Windows Central
 - Select each family to go through even off more inside information and actions you can take to free up infinite on Windows 10.


Erstwhile you complete the steps, you will check the storage usage and concenter areas to free up space. For example, indoors the System & reserved family, you will encounter how a lot space the facility, virtual memory, hibernation files, and system restore are using, and the amount of space the system is reserving for updates.
If you have ten-fold drives, under the "Many storage settings" section, click the Eyeshot storage usage on other drives option to open the page that lists each the drives along the twist.
3. Free up space deleting pro tem files using Harrow Cleanup on Windows 10
Happening Windows 10, it's still possible to discharge up space exploitation the legacy Saucer Cleanup tool.
Remove temporary files with Disk Cleanup
To use Disk Cleanup position to delete ephemeral files on Windows 10, use these steps:
- Open Start.
- Search for Phonograph recording Cleanup and select the top result to open the app.
- Use the "Drives" drop-down menu and select the (C:) drive (if applicable).
- Click the OK release.
-
Dog the Cleansing system files button.
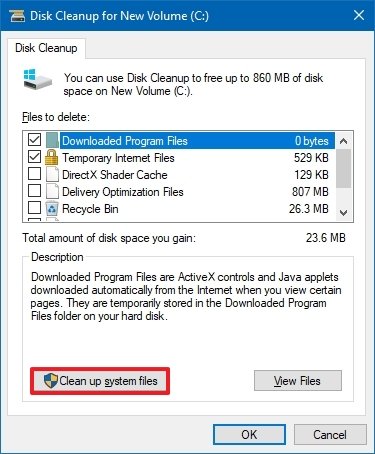 Source: Windows Central
 - Use the "Drives" drop-down fare and select the (C:) drive.
- Click the OK release.
-
Check every last the contents you want to delete:
- Windows Update Cleansing.
- Microsoft Guardian Antivirus.
- Downloaded Program Files.
- Temporary Internet Files.
- Windows error reports and feedback nosology.
- DirectX Shader Cache.
- Delivery Optimization Files.
- Device driver packages.
- Language Imagination Files.
- Previous Windows installation(s).
- Recycle Bin.
- Temporary files.
- Thumbnails.
-
Click the OK button.
 Source: Windows Bicentric
 - Click the Delete Files button.


After you complete the steps, those unnecessary files will be deleted from the device, freeing sprouted hard drive quad.
Delete System Restore and Shadow Copies using Disk Cleanup
If you use System Regenerate and the Shadow Copies features, you can also delete older files to reclaim additive space on Windows 10.
To delete erstwhile system of rules restore points, use these steps:
- Open Start.
- Search for Record Cleanup spot and select the top resultant role to open the app.
- Use the "Drives" drop-down fare and superior the (C:) labour (if applicable).
- Click the OK button.
-
Click the Cleanup system files button.
Author: Windows Point - Click the Much Options tab key.
-
Under the "System Restore and Shadow Copies" section, click the Clean up button.
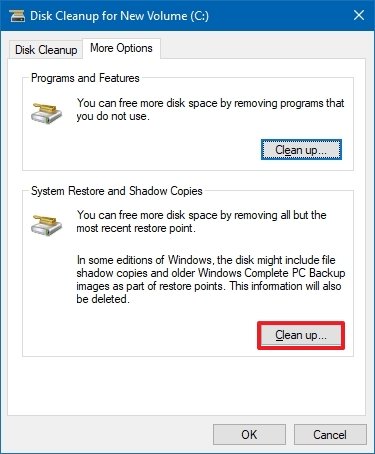 Source: Windows Bifocal
 - Click the Delete button.

After you clean the steps, you will reclaim some additional space to fund more epochal content.
4. Unhampered up space using OneDrive files on-demand on Windows 10
You can also use the OneDrive Files Happening-Require characteristic to make files usable online lonesome manually to regain some space cover on your computer.
Enable OneDrive Files On-Demand
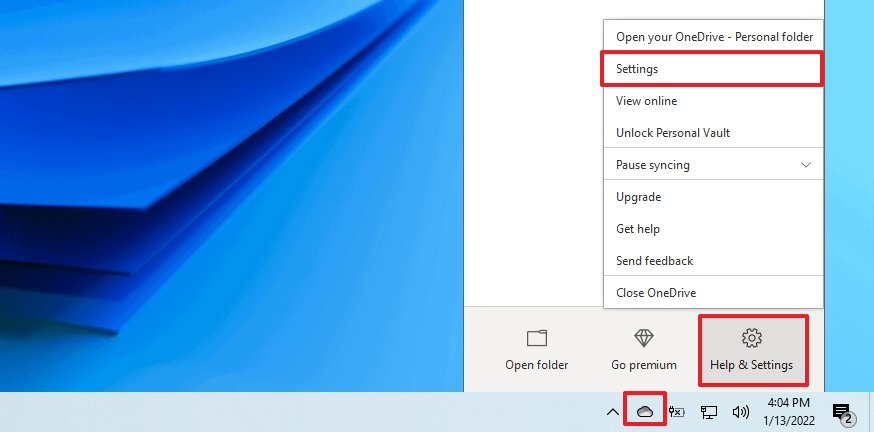
On Windows 10, the Files Connected-Demand feature should be already enabled in OneDrive, but if IT is not, use these steps:
- Chatter the OneDrive icon in the bottom-right box of the taskbar.
- Click the Help & Settings option.
-
Click the Settings option.
 Beginning: Windows Cardinal
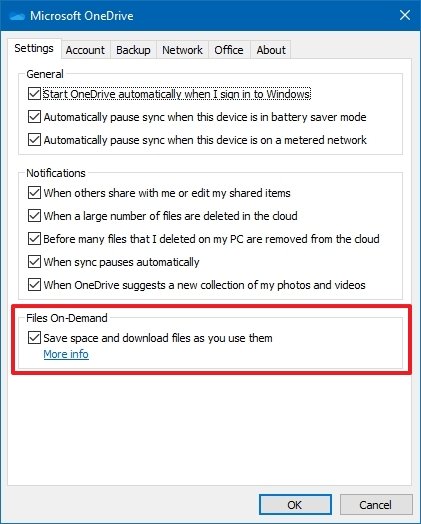
 - Click the Settings tab.
-
Under the "Files On-Demand" surgical incision, check the Save infinite and download files as you utilize them option.
 Seed: Windows Key
 - Click the OK button.


At one time you utter the steps, you can move files to the OneDrive folder and fix them available only online to free awake space (see stairs below).
Make files available online-lonesome
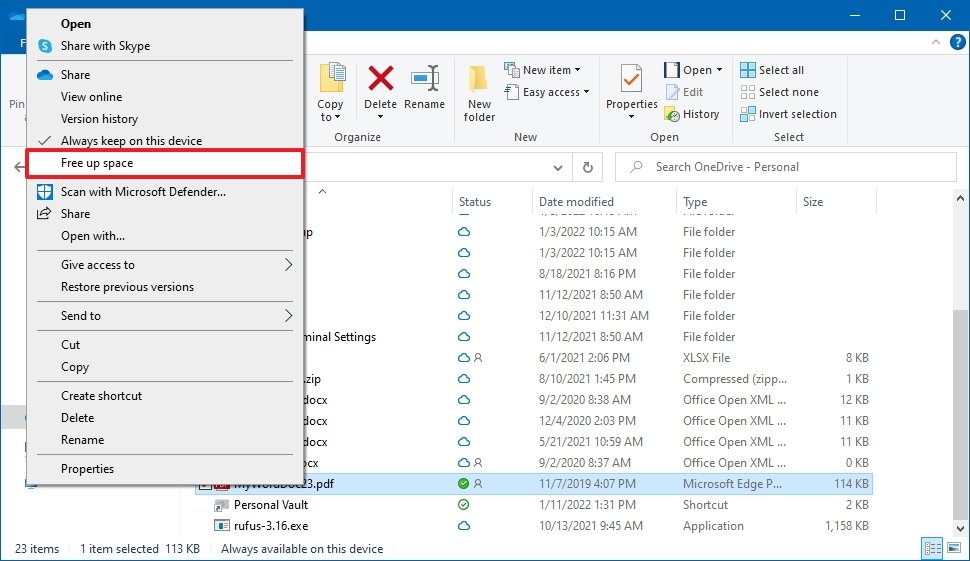
To spend a penny local files available online-only with OneDrive, use these steps:
- Open File Explorer.
- Select the OneDrive folder from the left pane.
-
Pick out the files and folders taking up the most space.
Quick hint: You can prize entirely files exploitation the Ctrl + A keyboard shortcut by selecting the first file, property down the Change over key, selecting the last files, operating theater material possession down the Ctrl primal and selecting for each one file separately.
-
Honourable-click the extract and pick out the Free up place option.
 Source: Windows Central

Later on you complete the steps, you will live able to access all of your content victimisation File Explorer, just you will only be able to open them with an net connection. Additionally to making synced files available only with an internet connection, you can on the loose up even more place by moving other files to the OneDrive folder and victimisation the supra steps to make them available happening-ask.
The free version of OneDrive only allows you to store up to 5GB of data. However, you can always get a Microsoft 365 subscription to lift the limit to 1TB. In addition to the 1TB of storage, the subscription also gives you access to all the Office apps and services like Microsoft Teams and Family Safety device.
Get signed
![]()
Microsoft 365
Microsoft 365 gives you full access to complete the apps and perks, such as 1TB OneDrive storage and Skype minutes. You can also instal Password, Excel, PowerPoint, Outlook, and new apps along up to five devices, and contingent the subscription, you can share the account with adequate to sestet people.
5. Free up space removing non-essential apps and games
Other way you can reclaim storage infinite is uninstalling apps you no more need or rarely use. Games also take up a lot of quad, which means that safekeeping the catalog to a marginal can significantly reduce space usance patc up gaming performance concurrently.
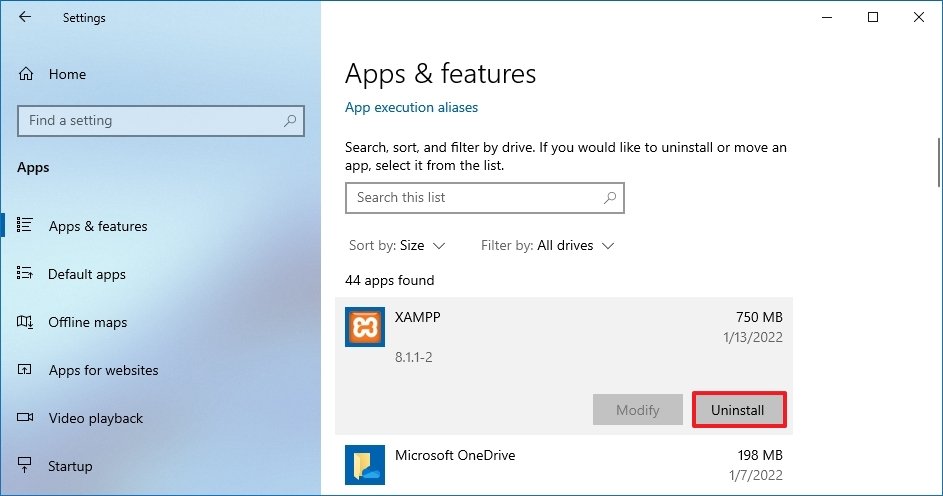
To uninstall apps and games on Windows 10, use these steps:
- Unsealed Settings.
- Click along Apps.
- Click on Apps & features.
- Use the "Variety past" sink in and select the Size view to quickly identify the apps and games victimisation the virtually space.
- Select the item to take away.
-
Penetrate the Uninstall button.
 Source: Windows Central
 - Click the Uninstall release again.
- Continue with the on-concealment directions (if practical).

Once you thorough the steps, recur the same instructions to transfer additional apps and games from the computer.
If you take in previously enabled the Windows Subsystem for Linux, you may too have one or multiple distros still installed connected your computer. You can always uninstall them to free up space on Windows 10.
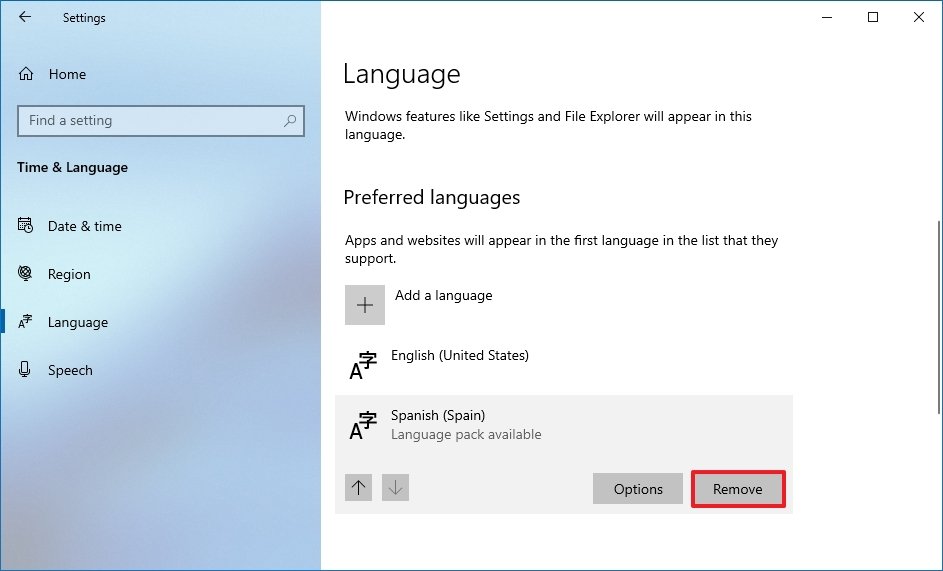
Cancel unused languages
Secondary languages can also use both of the memory. If you are not exploitation the other languages, remove them to make Thomas More elbow room for additional files.
To uninstall languages on Windows 10, use these stairs:
- Open Settings.
- Click on Time &adenylic acid; Language.
- Click on Language.
- Select the language to remove.
-
Click the Remove button.
 Origin: Windows Central

After you complete the stairs, you may need to reprize the instructions to delete additional languages as necessary.
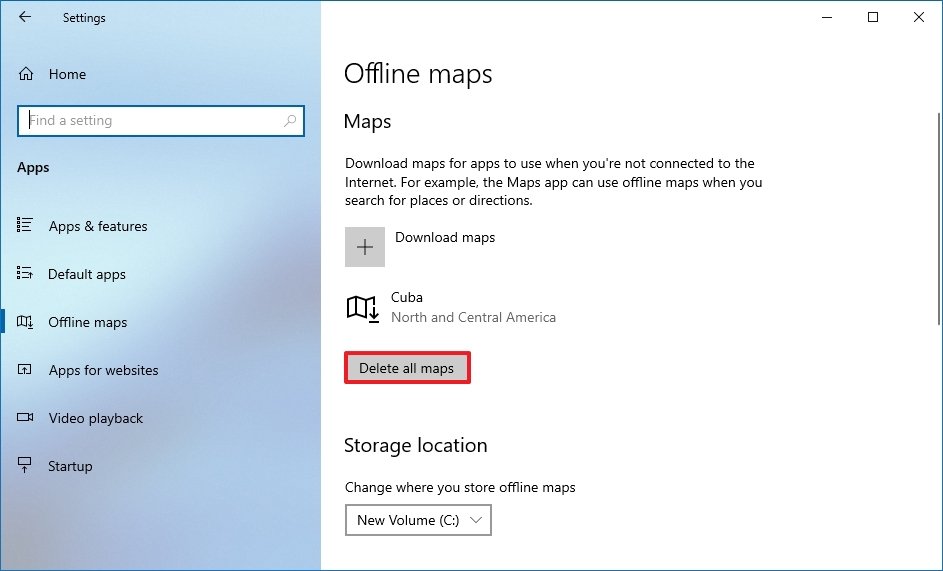
Delete maps
If you utilization the Windows 10 maps feature, you can remove the offline maps to clear up roughly additional place on the information processing system.
To take away downloaded maps packages, use these stairs:
- Unsealed Settings.
- Click on Apps.
- Dawn on Offline maps.
-
Dog the Erase all maps release.
 Source: Windows Central
 - Click the Cancel all button.

Once you complete the steps, the offline maps will be distant to make more space visible.
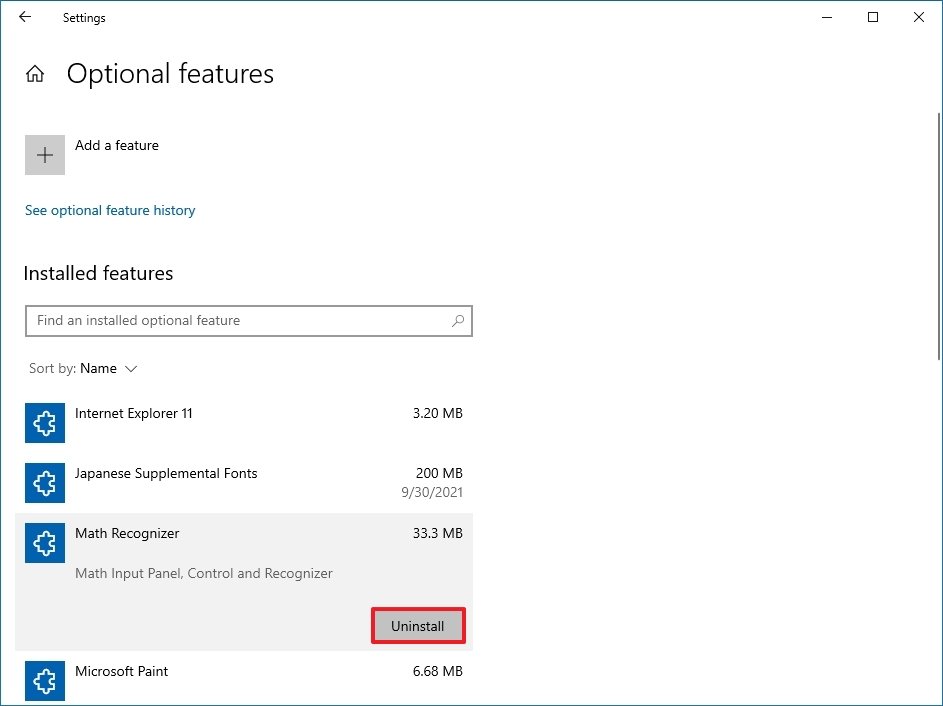
Uninstall optional features
Optional features (such Eastern Samoa Windows Media Thespian, Windows Hello Face, Math Recognizer, Windows Fax and Scan, and others) also take up storage, and you dismiss remove them to regain some extra space.
To remove optional features, manipulation these steps:
- Open Settings.
- Click on Apps.
- Click on Apps & features.
-
Under the "Apps & features" section, click the Optional features option.
 Generator: Windows Central
 - Flick the "Sort away" menu and choose the Install Sized option to determine the feature using the most distance.
- Select the feature to hit.
-
Click the Uninstall button.
 Source: Windows Centered


After you complete the steps, you May need to take over the instructions to remove other features you may no longer need.
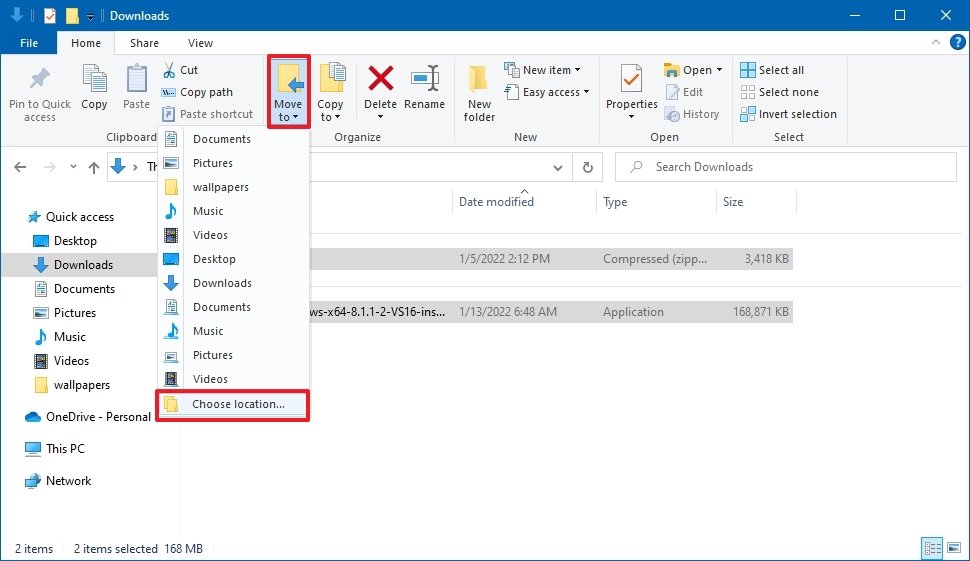
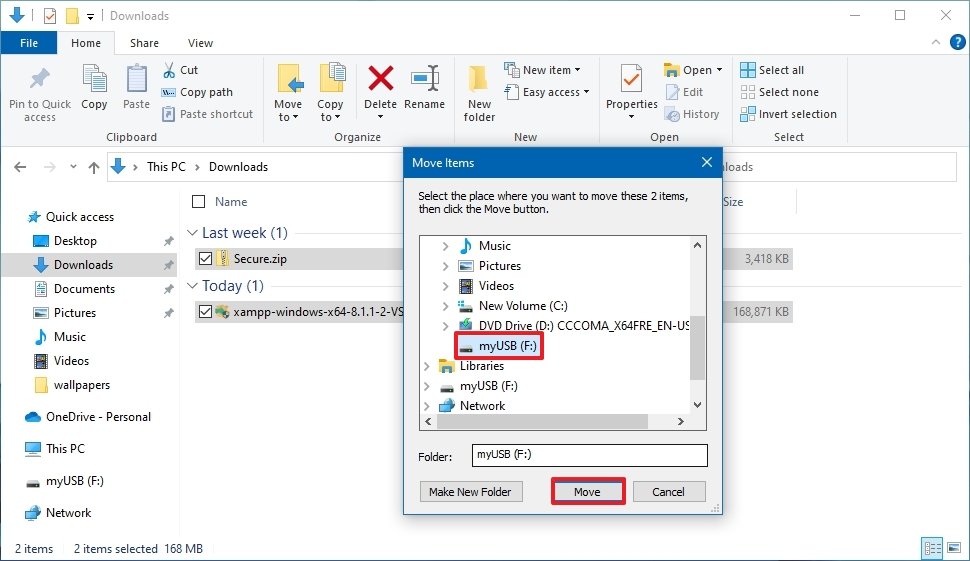
6. Free up space transferring files to external repulse
If the computer still does non have enough space, you can add together an external drive to move files over the new location. You can even configure the system to make the secondary storage the nonremittal placement to save files.
Transfer local files to external drive
To transfer existing files to an secondary storage, connect the private road you will dedicate to the electronic computer, and then use these steps:
- Open File out Explorer.
- Browsing to the folder with the content taking the most infinite.
- Select the items to move.
-
Click the Move to button from the "Home" pill.
 Source: Windows Focal
 - Select the Choose location option.
-
Choice the outer storage as the new destination.
Quick lean: If you want to keep files organized, you can use the available option to make up a new pamphlet to store the files in the new location.
-
Click the Move button.
 Source: Windows Central


Later on you complete the steps, you may take to duplicate the operating instructions to move additional files and folders to a early location to reduce the storage usage in the drive continual out of space.
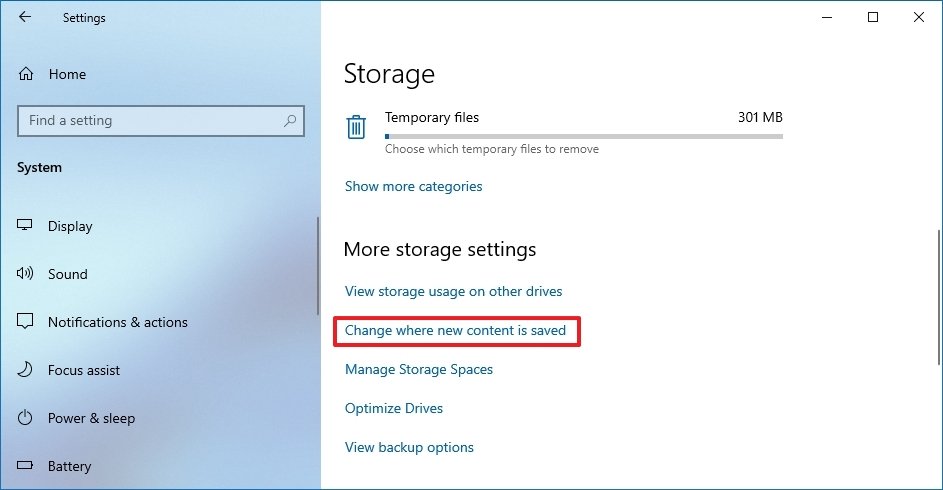
Configure external drive as new preserve localization
To allow the system to save files and install apps on an external drive mechanically, use these stairs:
- Spread ou Settings.
- Click on Organisation.
- Click connected Storage.
-
Under the "More storage settings" incision, click the Change where new content is redeemed option.
 Source: Windows Central
 -
Use the drop-down menus and quality the new location to save files automatically for each content typecast.
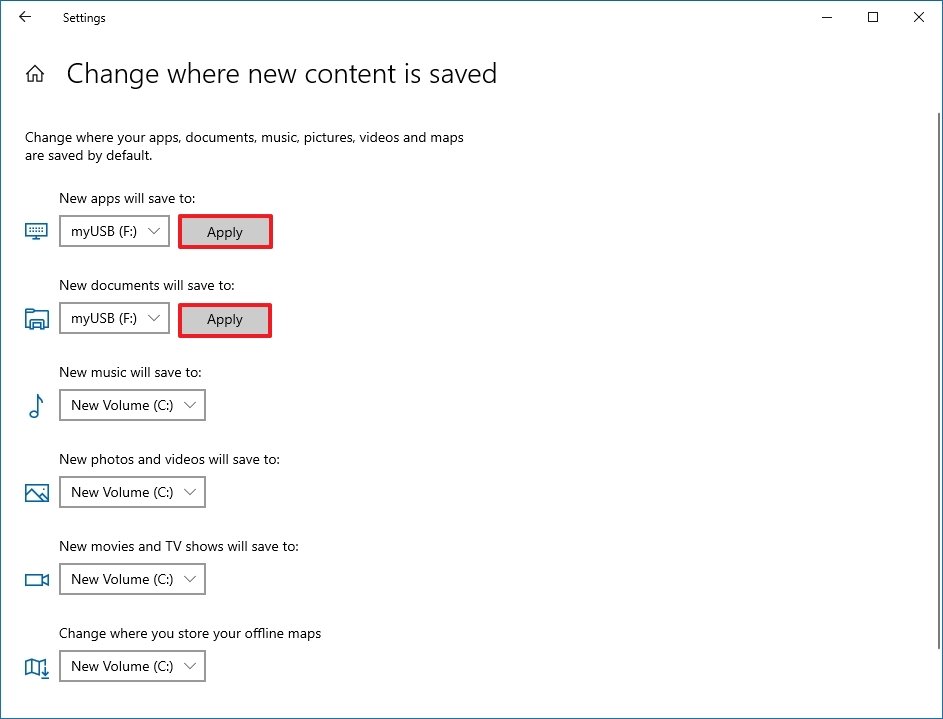 Informant: Windows Central
 - Employment the "New apps will Be save to" drop-down menu to select the driveway to install future apps by default.
- Click the Apply button for each setting.


Erstwhile you complete the steps, files, and apps from the Microsoft Store will deliver in the unweathered location you specified.
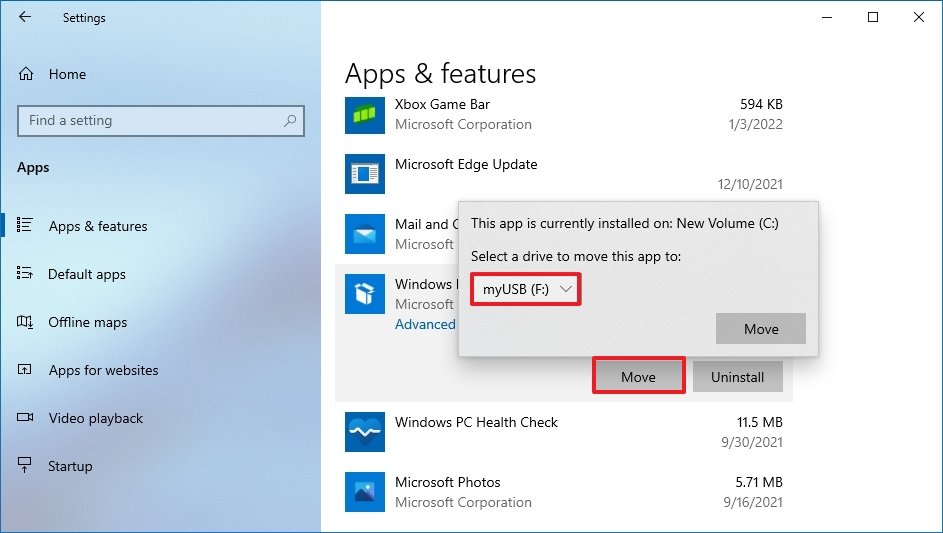
Relocate apps and games to new drive
On Windows 10, you can move most apps and games from the Microsoft Store already installed on the computer to an external storage, which can supporte reduce storage usage connected the system take.
To transference existing apps and games to another drive, connect the external storage to the computer, and then use these stairs:
- Open Settings.
- Come home on Apps.
- Click on Apps & features.
- Use the "Sort away" filter and blue-ribbon the Sized view to quickly identify the apps and games victimisation the all but space.
- Select the item to relocate.
- Click the Move release. (If the option is not available, the transfer feature is not available for that particular item.)
-
Use the drop-down menu to choose the new emplacemen.
 Informant: Windows Central
 - Click the Move button again.

Later you everlasting the steps, you may need to reduplicate the same instructions to affect additional apps or games to the new location.
When victimisation this feature, the external drive must always be affiliated to the device. Otherwise, you South Korean won't be able-bodied to launch the apps or play those games you moved to the new storage.
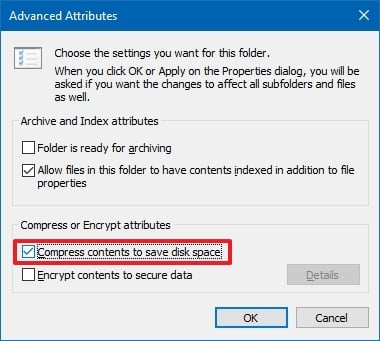
7. Spare up distance exploitation NTFS compression
You can also use the compression feature break u of the NT File System (NTFS) to reduce the storage usage of electric current files maintaining normal access without the need to zip your files. The feature is available to compress files, folders, or the entire drive.
Important: Data compression can negatively impact system performance as it has to constrict and decompress data on the tent-fly. You should use this pick only if you coiffe non receive another option or have capable hardware.
Enable booklet compression
To enable Windows 10 NTFS compression for a leaflet, use these stairs:
- Open File away IE.
- Browse to the folder to compress.
- Right-click the folder and prime the Properties option.
-
Click the Progressive button.
 Seed: Windows Central
 - Under the "Compress or Encrypt attributes" section, check the Compress contents to save disc space option.
-
Click the Okay button.
 Source: Windows Central
 - Click the Apply button.
-
Select the Apply changes to this folder, subfolders and files option.
Quick take down: If the folder already contains files, the first compression can take metre.
- Click the OK button.
- Click the Sooner State button again.


Aft you complete the stairs, the file in compression feature will enable reducing the size of it of existing and future files. (The above stairs focus on folders, but the same instructions apply to compress files one by one.)
If you no yearner want to habituate file contraction, you can revert the changes exploitation the same instructions, only on step 5, make sure to clear the Compress table of contents to save saucer space option.
Enable drive compression
To enable NTFS compression for the entire parkway, utilization these steps:
- Open File IE.
- Click along This PC from the leftist pane.
- Under the "Devices and drives" section, opportune-click the force to compress and select the Properties selection.
-
Jibe the Compress this drive to economise disk space option.
 Source: Windows Central
 Quick tip: Since compressing the instalmen repel can negatively affect performance, examine using this feature exclusively on a secondary drive OR partition off.
- Click the Go for button.
- Select the Apply changes to drive (cause letter), subfolders, and files option.
- Click the OK button.
- Click the OK release again.

Once you complete the steps, the file system bequeath constrict the drive and any content already on the storage without reformatting.
When the feature is no more needed, you can use the identical operating instructions to disable compression, just on stair 4, make reliable to clear the Compress this drive to save magnetic disk blank option.
8. Free up space disabling Hibernation on Windows 10
Hibernation is a corking characteristic disposable along Windows 10, which saves the information in memory onto the system drive earlier shutting down to preserve the current session upon resume. When the device comes back online, you can lift up where you liberal off.
Although it is a convenient feature, it requires gigabytes of place to save the retentiveness info into the hiberfil.sys file. If the twist is running out of room, disabling Hibernation tin help relinquish up space for more critical files.
To disable Hibernation on Windows 10 to free-soil up space, habit these steps:
- Spread ou Start.
- Search for Prompt, right-detent the circus tent result, and select the Run as administrator option.
-
Character the following command to disable Hibernation on Windows 10 and press Enter:
powercfg /hibernate off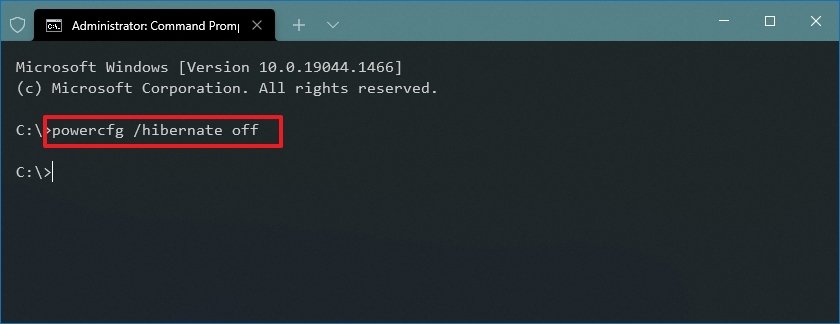 Source: Windows Central

Once you complete the steps, Hibernation will no yearner be available, but you will have Thomas More space for other files.
In the future, you crapper always re-enable the feature with the like operating instructions, but on step 3, make a point to use the powercfg /hibernate on command.
9. Free up distance compressing installation footprint of Windows 10
Compact OS is a tool that compresses the footprint of Windows 10 and apps. The boast is meant for devices with limited computer storage, but you tooshie use the tool to quickly reclaim a few gigabytes of space when you do not have auxiliary storage.
Warning: This is a friendly reminder that modifying system of rules files is risky, and it can cause irreversible damage to your installing if you do non do IT right. Ahead proceeding, it is recommended to make a working full championship of your Microcomputer.
To shrivel up the size of the Windows 10 installing and apps, use these steps:
- Open Start.
- Search for Bid Prompt, right-click the top result, and select the Run atomic number 3 executive option.
-
Typewrite the following command to enable Compress OS and conjur Move into:
compact.exe /compactOS:always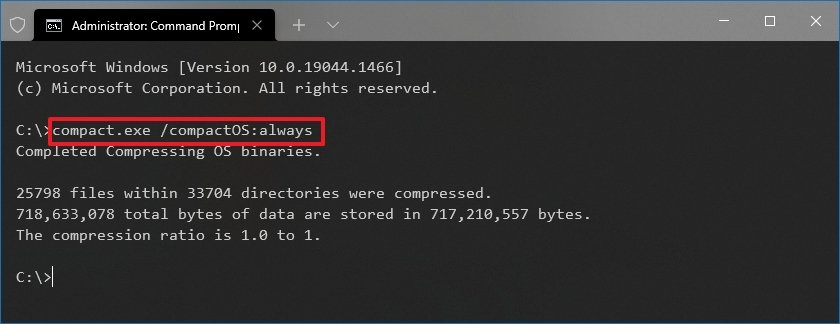 Source: Windows Central

Later you downright the stairs, the process will reclaim around 2GB of storage, slimly affecting performance.
When the feature is no longer necessary, you can forever revert the changes using the corresponding instructions, but on gradation 3, make true to use the compact.exe /compactOS:ne'er command.
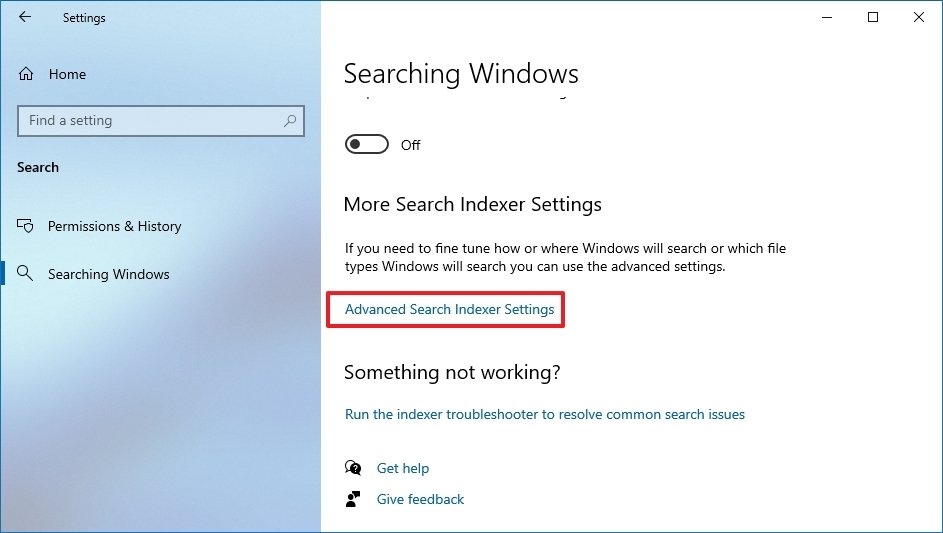
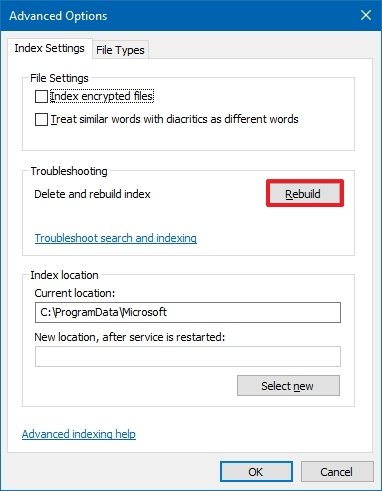
10. Unconstrained leading space rebuilding search indexer on Windows 10
The Windows Research database can sometimes grow very large for the amount of subject matter that needs indexing or indexing issues, and it can be one of the cases the system driving is flying out of space. If this is the case, clarification and rebuilding the database and modifying the index items can importantly slim down storage usage.
To rebuild the index of Windows 10, use these steps:
- Open Settings.
- Click on Seek.
- Click happening Searching Windows.
-
Low the "To a greater extent Seek Indexer Settings" section, click the Advanced Explore Indexer Settings alternative.
 Reference: Windows Central
 - Click the Advanced button.
- Click the Index Settings tablet.
-
Low-level the "Troubleshooting" incision, get across the Rebuild button.
 Reservoir: Windows Bifocal
 - Click the OK button.


Formerly you unmitigated the steps, the organization will trenchant and rebuild the Windows Search feature's index database.
The alone caution with this cognitive operation is that during the reconstruct, searches using the Taskbar, File Explorer, and across the experience might be incomplete until files are re-indexed.
Configure indexer
You can too minimize the space by preventing Windows Search from indexing specified locations.
To remove indexing folder locations from Windows Search, utilize these stairs:
- Open Settings.
- Click on Search.
- Click on Exploratory Windows.
-
Under the "More Search Indexer Settings" segment, cluck the Advanced Look Indexer Settings option.
Reservoir: Windows Inner - Click the Modify clitoris.
- Detent the Show all locations clit.
-
Unclouded the options for apps to exclude from the index database.
Ready notice: Generally speaking, you ne'er want to index any sympathetic of diligence.
-
Expand the C: drive and clear the folder you do not bid to appear in search to reduce the database warehousing usage.
 Source: Windows Central
 - Fall into place the OK button.
- Click the Close button.

After you complete the steps, Windows Look wish update the database, hopefully reducing its footmark, and qualification space for separate files.
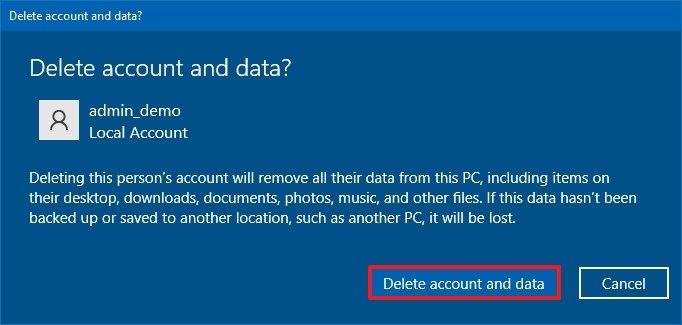
11. Free dormie space deleting users no longer sharing gimmick
If you share a computer with other people, it whitethorn be practical to free up blank away deleting accounts that no one is using anymore.
To delete substance abuser accounts and data on Windows 10, use these steps:
- Ajar Settings.
- Click happening Accounts.
- Click on Family &ere; other users.
- Quality the account no yearner in use.
-
Click the Remove button.
 Source: Windows Central
 -
Click the Delete account and data button.
 Source: Windows Central


Once you finish the steps, the profile and information testament live separate from the computer, regaining more space for different files. You may need to repeat the steps to delete other accounts.
12. Free up space disabling Reserved Storage on Windows 10
Windows 10 also includes "Upstage Storage," a feature that sets unconnected several gigabytes of distance for updates, system hive up, and irregular files. When unexampled updates are procurable, the system leave automatically clean up the storage to minimize problems during another updates.
Although this is a useful sport to minimize problems during updates and upgrades, IT takes away space you could use to store more documents, pictures, and videos. If you understand the feature and prefer not to use it, you give the axe incapacitate IT to free up additional space. The only caveat with this method is that once you disable the feature, the changes testament apply during the succeeding feature update of Windows.
Remarkable: Only use these book of instructions if you understand the feature. Otherwise, it is not advisable to disable Reserved Storage because the chances of issues during an update wish glucinium higher.
To disable Restrained Storage on Windows 10, use these steps:
- Bald Start.
- Search for PowerShell, right-click the top result, and select the Run as administrator alternative.
-
Eccentric the following dictation to confirm whether the feature film is enabled and press Enter:
Get-WindowsReservedStorageState -
Type the following command to disable the feature and press Recruit:
Set-WindowsReservedStorageState -State disabled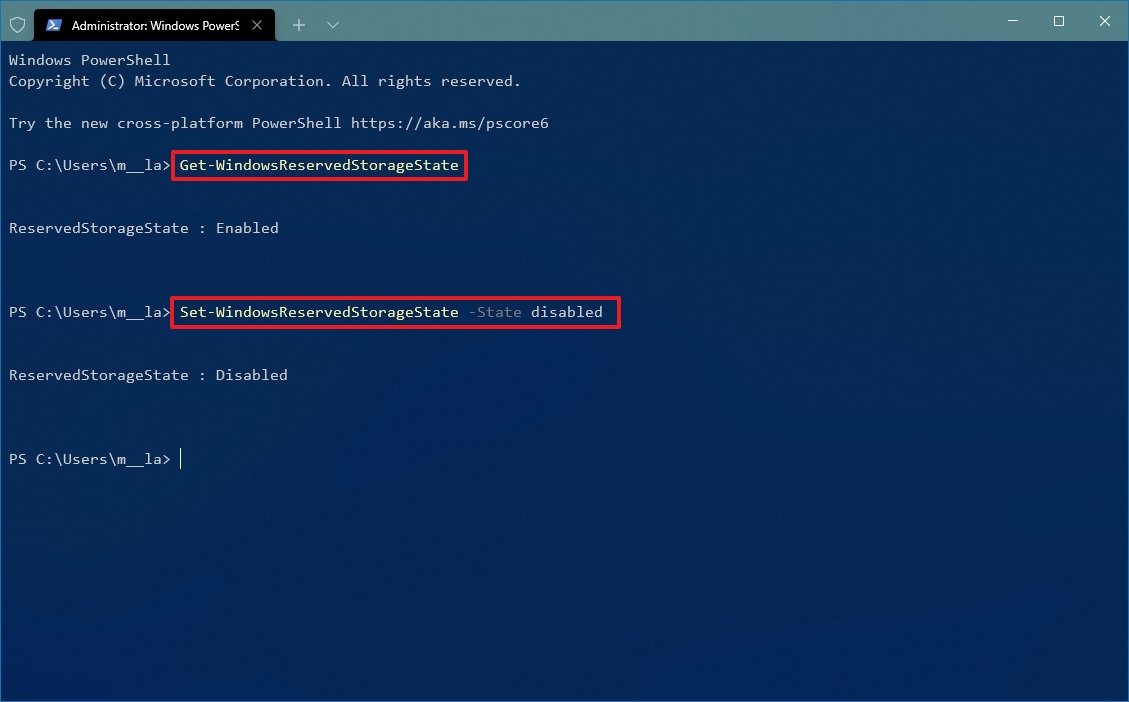 Source: Windows Central

After you complete the steps, Reserved Reposition will incapacitate happening Windows 10, allowing you to reclaim around 7GB of space after the next feature update of Windows 10.
To boot to all these different ways to atrip up drive infinite, sometimes malware can have store problems. If you note strange behaviors and the disk drive is running low in space, a virus may be causing the problem. If this is the case, you can employment these instruction manual to scan, detect, and remove any malware causing storage issues.
More Windows resources
For more helpful articles, insurance coverage, and answers to demotic questions about Windows 10 and Windows 11, chew the fat the shadowing resources:
- Windows 11 connected Windows Central — All you motivation to lie with
- Windows 11 help, tips, and tricks
- Windows 10 on Windows Midway — All you want to experience
We whitethorn earn a commission for purchases using our links. Learn more.
how to clear space on hard drive windows 10
Source: https://www.windowscentral.com/best-ways-to-free-hard-drive-space-windows-10

Posting Komentar untuk "how to clear space on hard drive windows 10"